PART 1. Smart Contracts Made Easy: Writing, Debugging, Deploying, and Frontend Integration for…
PART 1. Smart Contracts Made Easy: Writing, Debugging, Deploying, and Frontend Integration for Beginners This article is a little longer being the comprehensive guide of the time for Smart Contracts d

Etienne Maway
January 19, 2024 · 13 min read
PART 1. Smart Contracts Made Easy: Writing, Debugging, Deploying, and Frontend Integration for Beginners
This article is a little longer being the comprehensive guide of the time for Smart Contracts development. We shall explain and delve into demystifying the process of developing, testing, and deploying smart contracts, coupled with seamless integration with the front end. We managed to separate it into two parts. Our technological ensemble includes JavaScript, Hardhat, Solidity, Next.js 14, Wagmi, and Rainbowkit.
Unveiling the Technological Tapestry:
- JavaScript and Solidity: The dynamic duo of JavaScript on the backend and Solidity for smart contract development forms the foundation of our project, ensuring robust functionality and interoperability.
- Hardhat: Serving as our development environment, Hardhat streamlines the deployment and testing of smart contracts, providing a developer-friendly toolkit for Ethereum development.
- Next.js 14: Empowering our front end, Next.js 14 is the latest iteration of this popular React framework. Its flexibility and performance make it an ideal choice for crafting engaging user interfaces.
- Wagmi and Rainbowkit: As integral components of our frontend stack, Wagmi, and Rainbowkit enhance the user experience, facilitating seamless interaction with our deployed smart contract.
1. The Significance of Smart Contracts and Staking:
Smart contracts, self-executing contracts with the terms of the agreement directly written into code, have revolutionized the way transactions occur on blockchain networks. Their immutability, transparency, and trustless execution make them a cornerstone of decentralized applications.
Our focus will be on a staking smart contract, exploring its development lifecycle, and demonstrating how to interact with it from both the backend and front end. Staking involves participants locking up their cryptocurrency to support the operations of a blockchain network, earning rewards in return. This symbiotic relationship between users and the network enhances security and incentivizes active participation.
This article aims to unravel the intricacies of smart contract development, unlocking the potential for developers to contribute to the decentralized future and making the blockchain ecosystem more accessible to enthusiasts.
2. Overview of Smart Contract Structure
Purpose of the Smart Contract:
At its core, our smart contract, aptly named “Staking,” facilitates a decentralized staking mechanism on the blockchain. The primary purpose is to empower users to lock their cryptocurrency assets, AKA staking, for specific periods of time and earn rewards in return. This mechanism not only contributes to the security and consensus of the blockchain but also offers participants an avenue for passive income through the accrual of interest.
Key Components:
- Owner: Representing the address that initially deployed the contract. This address holds certain administrative privileges, overseeing contract initialization and potential future upgrades. The ownership structure ensures accountability and control.
- Staking Positions: At the heart of the smart contract are ‘staking positions,’ encapsulated within a structured data type called ‘Position.’ Each staking position includes essential details such as the position ID, the staker’s wallet address, creation and unlock dates, percentage interest, staked amount, interest earned, and an indicator of whether the position is open or closed. The dynamic array ‘positions’ stores these positions, and a counter ‘currentPositionId’ helps assign unique identifiers
- Interest Rate Tiers: Our staking contract introduces a dynamic interest rate system based on locked periods. This is implemented through the ‘tiers’ mapping, associating different interest rates with specific time frames. These tiers, denoted in days, determine the percentage of interest a staker earns. For example, staking for 30 days might yield a different interest rate compared to staking for 60 or 90 days.
- Lock Periods: The ‘lockPeriods’ array enumerates the available locked periods for stakers. It provides flexibility, allowing participants to choose a duration that aligns with their investment strategy. The smart contract dynamically adapts to changing market conditions and user preferences by supporting multiple lock periods.
- ReentrancyGuard: To mitigate potential security risks related to reentrancy attacks, a boolean variable named ‘reentrancyGuard’ is employed. This protective measure ensures that the contract can only execute one function at a time, preventing unauthorized reentry into the contract during critical operations.
The smart contract orchestrates a sophisticated interplay of these components, creating a secure and flexible staking platform. Each of these elements plays a pivotal role in the functionality and integrity of our decentralized staking solution.
Let’s dive in!
3. Setting Up the Development Environment:
In this section, we guide you through the steps to configure your development environment using JavaScript, Hardhat, and Solidity.
If you’re interested in learning more about how to set up an environment with Typescript, Hardhat, and Solidity, check out my previous article on Custom ERC20 Smart Contract.
Prerequisites:
- Node.js and npm:
- Ensure Node.js and npm (Node Package Manager) are installed on your machine.
- You can download them from https://nodejs.org/
2. Text Editor:
- Choose a text editor or an integrated development environment (IDE) for coding. Popular choices include Visual Studio Code, Atom, or Sublime Text.
3. Initialize Your Project:
Start by creating a folder and call it anything. Inside that folder, create your backend folder, call it smartContract
- Open a terminal and navigate to your smartContract directory.
- Run the following command to initialize a new Node.js project:
4. Install Hardhat:
- Install Hardhat as a development dependency by running:
5. Initializing Hardhat Project:
In your backend directory and run the following command to initialize a new Hardhat project:
Follow the prompts to configure your project. You may choose the default settings for simplicity or customize them based on your preferences.
6. Installing Solidity:
Ensure you have Solidity installed to enable the compilation of smart contracts. You can use npm to install Solidity:
Project Structure:
Your project structure in your smartContract folder should now include important files and directories such as hardhat.config.js, contracts/ (for storing your Solidity contracts), and scripts/ (for additional scripts or deployment scripts).
Install Additional Dependencies:
- You might need additional Hardhat plugins or libraries depending on your project requirements. For example, to interact with Ethereum networks, you can install ethers:
With this environment set up, you’re now equipped to dive into the world of smart contract development. In the upcoming sections, we’ll explore the implementation of our staking smart contract, leveraging the power of JavaScript, Hardhat, and Solidity.
4. Implementing the Staking Smart Contract
In your contracts` folder, you can create a file Staking.sol or you can name it anything you want; only make sure to have .sol extension to mean a solidity file; and paste this code:
Bellow is more explanations to complement the documentation about the structure and the functionalities in the contract above
Structure and Management variables
- owner: A public variable storing the address of the contract owner.
- Position: A struct representing a staking position, encapsulating various details such as ID, wallet address, creation date, unlock date, interest rate, staked amount, interest earned, and an indicator if the position is open or closed.
- position: A variable storing the current staking position, representing the most recent staking activity.
- currentPositionId: A counter for position IDs, ensuring each staking position has a unique identifier.
- positions: A mapping storing staking positions by their unique position ID.
- positionIdsByAddress: A mapping linking wallet addresses to arrays of position IDs, enabling easy retrieval of an individual's staking history.
- tiers: A mapping associating interest rate tiers with different locked periods.
- lockPeriods: An array storing available locked periods for staking.
- The constructor initializes the contract, setting the owner to the address deploying the contract, and defining interest rate tiers based on locked periods. The lock periods are stored in the lockPeriods array.
Functionalities
- receive() payable external {}: This function allows the contract to accept incoming Ether without invoking any specific function. It acts as a fallback function.
- stakeEther: This, encapsulates the essence of user interaction with the staking smart contract, allowing users to stake Ether for a specified duration and earn rewards based on the associated interest rate tier.
- The getContractBalance function, marked as public and of type view, is particularly useful for transparency and auditability, providing a quick snapshot of the amount of Ether held within the contract at any given moment.
- The calculateInterestTiersfunction plays a crucial role in the staking process by computing the interest amount based on the specified interest rate and the user’s staked amount. It ensures a fair and transparent reward mechanism for participants, adhering to the principles of decentralized finance
- The closePosition function provides a secure and controlled mechanism for users to close their staking positions, ensuring that only the position creator can initiate the withdrawal. It incorporates safeguards against reentrancy attacks and verifies the openness of the position before executing the withdrawal, contributing to the overall security and reliability of the staking contract.
5. Testing the Smart Contract
Testing smart contracts is a critical step to ensure both security and functionality. Rigorous testing helps identify vulnerabilities, ensures that the code behaves as intended, and builds confidence in the reliability of the smart contract. Hardhat offers robust testing capabilities that enable developers to craft comprehensive test suites.
Importance of Testing
- Security Assurance: Testing helps identify and mitigate potential vulnerabilities, reducing the risk of attacks or exploitation.
- Functionality Validation: Ensures that the smart contract behaves as expected, adhering to its intended logic and specifications.
- Bug Detection: Uncovers and resolves bugs or errors that could compromise the performance of the contract.
- Gas Usage Optimization: Efficiently written contracts lead to lower gas costs, and testing helps optimize gas usage.
- Compliance Verification: Ensures that the smart contract complies with any predefined standards or requirements.
In your tests folder, Hardhat generated it in initialization, create a file, and name it Staking.js , then paste this code:
If you are using typescript, you can consider checking how to write tests in typescript in my precedent article here
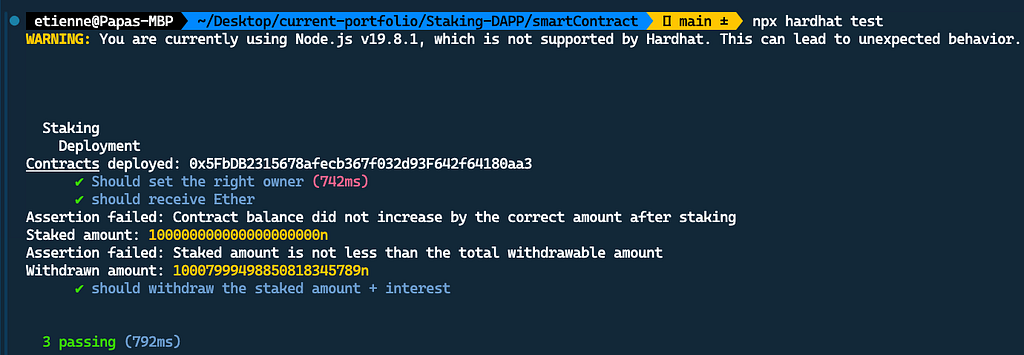
From the smartContractc folder level, you can run this command:
The above command will compile and run the tests of your smart contract. You should be able to have this output from your terminal :
6. Deploying the Smart Contract with Hardhat:
Deploying a smart contract using Hardhat involves a series of steps, from configuring deployment scripts to executing deployment commands. Let’s explore some essential steps:
1. Configure Hardhat Networks
In the file hardhat.config.js paste the following configuration:
- ${process.env.INFURA_API_KEY} and ${process.env.DEPLOYER_PRIVATE_KEY} are placeholders for environment variables. You need to set these environment variables in your shell or in a .env file.
- Ensure you have the required environment variables set before running Hardhat commands.
For more information about infura environment variables, go here
Remember to handle sensitive information securely, and consider using tools like dotenv to manage environment variables in development. Always keep private keys and API keys confidential and avoid hardcoding them directly in your code.
2. Create a Deployment Script
Create a deployment script in the scripts/ directory of your Hardhat project. For example, you can create a file named deploy.js. This script should contain the logic for deploying your smart contract.
We prefer focusing on the tesnet, SEPOLIA in this case, since the process is as same as deploying to the MAINNET.
Now you can run this command to deploy your so long built smart contract to the blockchain:
If you have followed the steps correctly from the beginning, the console will display the address of your deployed smart contract. You can copy this address and visit etherscan.io to view the details of your deployed smart contract.
Congratulations, now you have all the backend set, your smart contract deployed, and the generated ADDRESS, the ABI, and the SIGNER will be used in the frontend to interact with your smart contract. This is what we have been chasing all along. You will know more about it in PART 2 to have seamless interactivity between your smart contract and the UI we are about to build.
FRONTEND PART TO BE CONTINUED…