Building and Testing a Custom Ethereum ERC-20 Token Smart Contract from Scratch
Ethereum’s ERC-20 standard is the backbone of countless tokens, and we’re about to embark on a journey to create one from scratch— no shortcuts, no external libraries; just pure blockchain development

Etienne Maway
October 14, 2023 · 9 min read

Ethereum’s ERC-20 standard is the backbone of countless tokens, and we’re about to embark on a journey to create one from scratch—no shortcuts, no external libraries; just pure blockchain development.
In this article, we’ll delve into the inner workings of an ERC-20 token smart contract. We’ll dissect the code, write comprehensive tests, and ensure it operates seamlessly. But that’s just the beginning. In a follow-up article, we’ll deploy our custom ERC-20 token to the Blockchain, bringing our creation to life.
Overview of ERC-20
The ERC-20 standard, short for Ethereum Request for Comment 20, is like a recipe for making tokens on Ethereum. It provides clear rules and instructions that have made token creation easy, consistent, and user-friendly, serving as a fundamental piece in blockchain and decentralization.
Suppose you’ve ever wondered how tokens power DeFi and more, join us for an exploration into the world of smart contract development and Ethereum’s vital ERC-20 tokens. Let’s dive in!
Setting Up the Development Environment
Let’s configure the development environment using Yarn and TypeScript. Follow these steps:
1. Install Yarn.
Start by installing Yarn globally using the instructions on the official Yarn website for your specific operating system:
2. Create a New Directory:
First, we create a new directory to organize our project, you can choose to name it anything you want.
mkdir ERC-20-Smart_contract && cd ERC-20-Smart_contract
- mkdir stands for "make directory" and creates a new folder named "ERC-20-Smart_contract"
- cd stands for "change directory" and navigates into the "ERC-20-Smart_contract" folder.
3. Initialize a TypeScript Project
We want to set up a TypeScript project. We use yarn initto initialize a new project with default settings.
- yarn init -y command initializes a new project, asking for details about the project (which -y skips by accepting the default values).
4. Install Hardhat
Hardhat is a developer tool for scaffolding smart contract projects.
We use yarn package manager to install Hardhat as a development dependency in our project.
yarn add --dev hardhat
- yarn add installs a package. --dev flag specifies it's a development dependency.
5. Initialize Hardhat Project
We initialize a Hardhat project inside our “ERC-20-Smart_contract” folder.
npx hardhat init
- npx allows us to run packages without installing them globally.
- hardhat init sets up a new Hardhat project in the current directory
After a successful setup, your project structure will look like this:
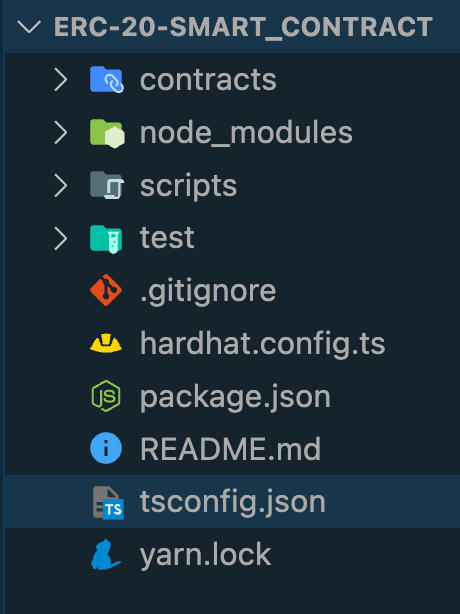
Finally, open thetsconfig.json and paste this code to ensure it has the necessary configurations for TypeScript:
Contract Implementation
Let’s create a new file named ERC20Token.sol inside the contracts directory. This initial smart contract lays the foundation for ERC-20 tokens on Ethereum, including essential functionalities like transferring tokens, checking allowances, approving transfers, and initializing token parameters.
This is what’s happening here:
- SPDX-License-Identifier indicates the license under which the contract is released.
- UNLICENSED means the contract has no specified license.
- pragma solidity ^0.8.19; ensures the contract is compiled with a compatible version of the Solidity compiler (0.8.19 or newer).
State Variables:
- name: Holds the name of the ERC-20 token.
- symbol: Represents the symbol or ticker for the ERC-20 token (e.g., "MCN" for Master Coin).
- decimals: Specifies the number of decimal places the token has ( e.g., 18 for Ether).
- totalSupply: Contains the total supply of the ERC-20 token.
- owner: Stores the Ethereum address of the contract owner.
Mappings:
- balanceOf mapping stores the balance for each address.
- allowance mapping stores approved allowances for transfers.
Events:
- Transfer event is emitted on the successful transfer of tokens.
- Approve event is emitted on approval of token transfer allowance.
Constructor does:
- Assign the provided _name, _symbol, and _decimals to the respective state variables.
- Calculate the total supply based on _initial_supply and _decimals.
- Assign the total supply to the contract owner’s balance.
- Set the contract deployer (message sender) as the owner of the contract.
This ensures that when the contract is deployed, the provided initial supply is assigned to the contract owner.
Implementing transfer function
- The function is named transfer.
- It takes two parameters: _to (address to transfer to) and _value (amount of tokens to transfer).
- It’s a public function and returns a boolean indicating the success of the transfer.
- emit Transfer(msg.sender, _to, _value): Emits a Transfer event, indicating a successful transfer from the sender to the recipient with the specified amount.
This function facilitates the transfer of tokens from the sender (msg.sender) to another address (_to). It verifies that the destination address is valid and the sender has enough tokens before adjusting the balances and emitting a Transfer
Implementing “getAllowance”, “approve” and “transferFrom” functions
getAllowance function:
- This function is a view function, meaning it doesn’t modify the contract state.
- It allows a user to check if a specific spender (_spender) is allowed by the owner (_owner) to spend tokens on their behalf.
- It returns true if the spender has an allowance greater than zero, indicating they are allowed to spend on behalf of the owner.
approve function:
- This function allows a token owner to approve another address (_to) to spend a specified amount of tokens (_value) on their behalf.
- It updates the allowance mapping to reflect the approved amount for the spender.
- It emits an Approve event to record the approval.
transferFrom function:
- This function allows a spender (msg.sender) with approval from the token owner (_from) to transfer tokens from the owner to another address (_to).
- It checks if the specified _value is valid based on the available balance and allowance.
- If valid, it transfers tokens from _from to _to, updates balances and allowances accordingly.
- It emits a Transfer event to record the transfer.
These functions facilitate controlled and authorized token transfers, providing flexibility and security in managing token transactions.
Complete Implementation of the Smart Contract
Compile the Smart Contract Code
Compiling a smart contract is vital for error checking, efficient code execution, and secure deployment. Additionally, it enables the creation of the Application Binary Interface (ABI), facilitating smooth communication and interaction with the contract on the blockchain and external applications.
- npx hardhat compile
If the compilation process proceeds without issues, you’ll receive a “Compilation Successful” message, and the contract ABI will be generated, stored in the build folder.
Testing the Smart Contract
While a successful compilation of our smart contract is a good start, it doesn’t guarantee its accuracy. To ensure it functions as intended, it’s imperative to create and run test cases covering various scenarios, including edge cases. This step is especially critical because once a smart contract is deployed on the blockchain, it becomes unchangeable.
We shall be testing the following functionalities:
name()
- Ensures that the contract returns the correct name of the token.
symbol()
- Ensures that the contract returns the correct symbol of the token.
owner()
- Validates that the contract returns the correct owner address.
balanceOf(address)
- Verifies if the contract correctly returns the balance of a given address.
transfer(address, uint)
- Tests the transfer of tokens from one address to another.
approve(address, uint)
- Tests the approval mechanism, allowing one address to spend tokens on behalf of another.
transferFrom(address, address, uint)
- Ensures that tokens can be transferred from one address to another by an approved spender.
getAllowance(address, address)
- Verifies if the contract correctly checks if an allowance is set for a specific spender.
Let’s create ERC20Token.spec.ts file inside the test directory and paste in these different test cases:
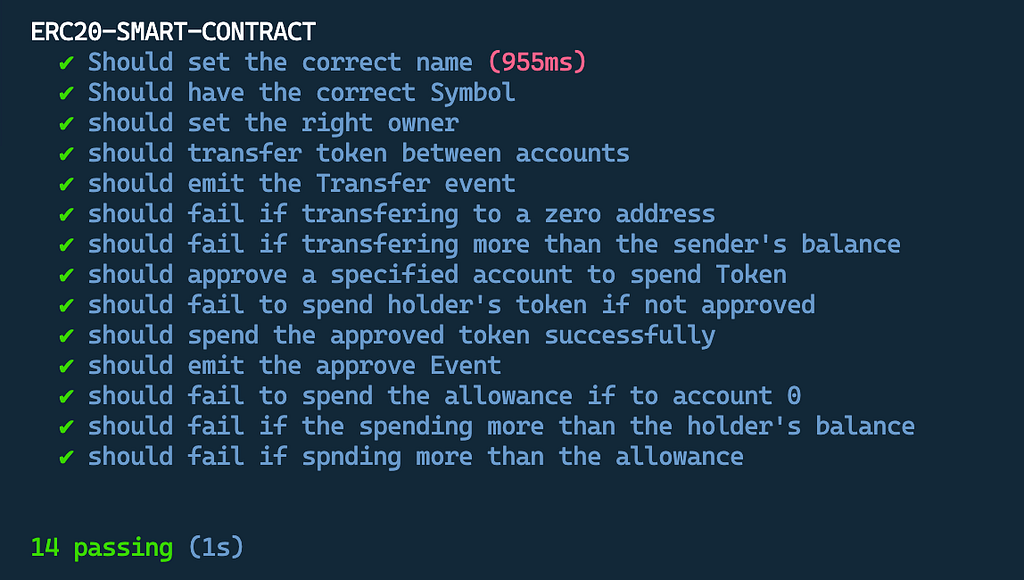
We can now run the test command:npx hardhat test and you should have the following result:
Conclusion
This article primarily focussed on building and thoroughly testing an ERC-20 token contract locally. Our meticulous design and implementation covered vital aspects like balance tracking, transfers, allowances, and more. We achieved a successful compilation, highlighting the necessity of error-free code, and conducted rigorous testing to ensure our contract’s reliability across various scenarios.
However, it’s important to acknowledge that we didn’t delve into certain security vulnerabilities such as potential reentrancy attacks and other security aspects, these are crucial in real-world deployments.
Stay tuned for our next tutorial, where we’ll take our knowledge to the next level. We’ll explore deploying this contract on the blockchain. We welcome your questions and suggestions in the comments, fostering a collaborative learning environment within the evolving blockchain space.
You can find the full code from here